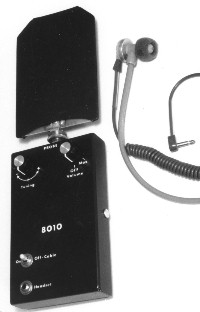
 The 8010G locates ferrous and non-ferrous metals as well as mineral based material. The unit consists of an oscillator/ amplifier assembly, flat search probe, probe extension cable, special 600 ohm headset and carrying case. The 8010G operates on the "beat-frequency" principle where an internal oscillator is tuned to, or near, the frequency of an external oscillator whose frequency is determined by the coil and circuitry in the probe. When the two oscillators are tuned to exactly the same frequency they are said to be in "zero-beat." Any difference in frequency between the internal and external oscillators is amplified and applied to the headset. TO OPERATE: Insert the probe into the PROBE jack on the main amplifier assembly. Insert the headset into the HEADSET jack. Turn the unit ON by rotating the VOLUME control one-quarter turn clockwise. While holding the unit away from the body and any metallic objects, rotate the TUNING control from - to + until a null or zero-beat (no tone) is heard. After the null is located, turn the TUNING control slowly towards the + side until a tone is heard whose pitch approximates the dial-tone of a telephone. As the probe is brought near metal, note that the pitch of the tone increases and as the probe is brought near mineral material (try your hand) the pitch of the tone decreases. The correct operating position of the probe is to have the number "6" facing away from the object being searched or towards you. The probe may be extended from the amplifier by using the extension cable supplied. Do not attempt to change the length of this cable. To use the cable, remove the probe from the main unit and insert it into the jack at the end of the cable. Insert the cable into the main unit. It may be necessary to slightly re-tune the unit. A single 9 volt battery (Alkaline always preferred) powers the 8010G. To replace the battery, loosen the two (2) silver screws on the sides of the unit one or two turns. Lift off the cover, remove the old battery and insert a fresh one. Place in the same position as the old one, replace the cover (being careful not to pinch the battery leads) and tighten the two screws (don't over-tighten). Should the TUNING control drift to + or - 30% of the center line it may be re- tuned by the following procedure. Place the TUNING control in the center of its range, i.e. the white line on the tuning control knob facing the small white line on the tuning arc. Use a nonmetallic tuning tool to slowly adjust the coil, accessible through the back of the unit, until a null or zero-beat is heard. It will not be necessary to turn the slug in the coil more than 1/16th of a turn in either direction. ALWAYS TURN THE UNIT OFF WHEN NOT IN USE.
1/15 |